

pfSense – OpenVPN
How to setup OpenVPN on a pfSense
Prerequisites
- Upgrade to 23.x, there are much better options with this firmware
Setup using Active Directory
- Before you begin you should have:
– a working PfSense router set up as the default gateway for your network
– a working instance of Active Directory
– a second internet connection to test fromNotes:
– Steps in Active Directory are just examples. You can do it all with remote management tools, PowerShell and there are probably other ways.
– The PfSense router in my network has ip address 192.168.90.1. The only AD server has 192.168.90.2.
– My Active Directory is called test.lab; the server is called server01.test.lab.
– My test user is called Pino van Sesamstraat; his username is pino, or pino@test.lab.
– It is very possible to run multiple OpenVPN instances on the same server. Just make sure the port-protocol combinations don’t overlap.
– Why so many screenshots? Because you can never have enough screenshots.The steps:
On your Active Directory domain controller:
– create an Active Directory VPNusers group
– A. for RADIUS: install and configure RADIUS on Windows
– B. for LDAP: create a user accountOn your PfSense router:
– set up an authentication server
– install a certificate authority, either RADIUS or LDAP
– create an internal certificate
– set up the OpenVPN server
– configure the firewall
– create a user account
– install the OpenVPN Client Export Utility
– prepare the Windows packagesOn the Windows client:
– install the OpenVPN package
– using the Windows client
– tweaking the client -
On your Active Directory domain controller
In Active Directory Users and Computers create a Global Security group called VPNusers. The group scope can be universal or domain local if you prefer.

Create a test user and add them to the group.

Option A: RADIUS
If it’s not on your server yet install the Network Policy and Access Services Server Role on your Active Directory Domain Controller:
Open Server Manager, choose Manage > Add Roles and Features.

Choose Role-based or feature-based installation.

Select your server.

Select Network Policy and Access Services.

Check Include management tools (if applicable). If applicable. And click Add Features.

Click Next.

Skip the Features and click Next.

Note it says you can deploy NPS as a RADIUS server. Dandy!

Click Install and wait for the installation to finish.


Cripit!
Create a RADIUS client in the Network Policy Server
From Server Manager > Tools choose Network Policy Server.

Expand NPS > RADIUS Clients and Server, right-click RADIUS Clients and choose New.

Friendly name PfSense VPN (or whatever you want) Address 192.168.90.1 (your PfSense router’s address) Select Generate and click the Generate button to generate a shared secret. Save this key because you will need it later. Click OK.

Expand Policies, right-click Network Policies and click New.


Policy name Allow PfSense group. Type of network access server Unspecified. Click Add to create a new condition.

Select User Groups and click Add.

Click Add Groups.

Enter the name of the vpn group you created earlier and click OK.

Click OK.

Click Next.

Select Access granted and click Next.

Click Next.

OooOoh, more options! Play with it later. For now just click Next.

The encryption settings are for Routing and Remote Access Service. We’ll be using RADIUS, not RRAS so these settings don’t apply here. Just click Next.

Seems like the Wizard is done. Click Finish.

Option B: via LDAP
You can have PfSense authenticate using LDAP queries on Active Directory. That way there is no need to set up a RADIUS server. I suggest you create a dedicated Active Directory user for this with a hard password. Set the password to never expire (or make sure you make a calendar note to change it both in AD and PfSense in time lest your ). The dedicated user needs to be part of AD but does not need to be a member of any groups, let alone the Administrators group. I called my user ovpn.
A word on digging around in your Active Directory for your settings. By default Active Directory Users and Computers will not show you much LDAP settings. To get a bit more information, open the View menu and check Advanced Features.

Now if you view an object’s properties you’ll find a tab called Attribute Editor where you’ll find such things as the distinguishedName (DN) and Common Name (CN). Doubleclick a value to edit or copy it.

On your PfSense router.
We’re going to set up two-factor authentication. The first factor is a certificate and the second is your Active Directory password.
To deal out certificates per user we’ll first set up a Certficate Authority. Go to System > Cert. Manager and click Add.

First, set the Method to Create an internal Certificate Authority.
Descriptive name OpenVPN_CA (or anything you want, really) Key length (bits) 2048, or whatever you want. Lifetime (days) this is your certificate authority so I suggest you set this nice and high if you don’t want to replace all your clients’ vpn certs too often. Country, etc. fill out your information. Common name OpenVPN_CA (or whatever you like but I suggest you keep it simple) 
Now we must create an internal certificate for the OpenVPN server to use.
Go to System > Cert. Manager > Certificates and click Add/Sign.
First set the Method to Create an internal Certificate.
Descriptive name OpenVPN_Cert Certificate authority OpenVPN_CA Key length 2048 (or whatever’s your fancy) Digest Algorith sha256 (idem) Lifetime (days) 3650 Fill out the Country etc. Common Name OpenVPN_Cert (keep it simple) Certificate Type Server Certificate 
Now for the second authentication part: Active Directory.
Option A: via RADIUS.
Go to System > User Manager > Authentication Servers. Click Add.

Descriptive name RADIUS Type RADIUS Protocol leave at MS-CHAPv2 Hostname or IP address 192.168.90.2 (your AD RADIUS server’s ip address) Shared Secret the shared secret you had generated earlier. Services offered Authentication and Accounting Keep the default ports, set Authentication Timeout to a sane value or leave empty.

Option B: via LDAP
Go to System > User Manager > Authentication Servers. Click Add.Descriptive name Active Directory Type LDAP Hostname or IP address 192.168.90.2 (your domain controller’s address) Port value 389 Transport TCP – Standard Protocol version 3 Search scope Entire Subtree (unless all your users are in that one OU) Base DN DC=TEST,DC=LAB Authentication containers CN=Users (unless you keep your users in a different OU) Extended query &(objectClass=person)(memberOf:1.2.840.113556.1.4.1941:=CN=VPNusers,CN=Users,DC=test,DC=lab) This will only return objects with objectClass ‘person’ (users you created) who are a member of (groups who are a member of) the VPNusers group. That memberOf:1.2.840.113556.1.4.1941: is a static name: it does not vary per installation and it is not a string. It is the literal name of the group. Bind anonymous uncheck Bind credentials the dedicated user and password you created earlier in Active Directory for specifically this purpose Initial Template AD (this fills out the rest of the attributes; this option will disappear after usage) User naming attribute samAccountName Group naming attribute cn Group member attribute memberOf 
There are probably better ways to do this. If you know them and you have tested them please feel free to mention them in the replies. The above settings are what works for me.
Setting up the OpenVPN server
Go to VPN > OpenVPN > Server and click Add.

You can change most tunnel values to your liking; my settings are just suggestions and/or defaults.
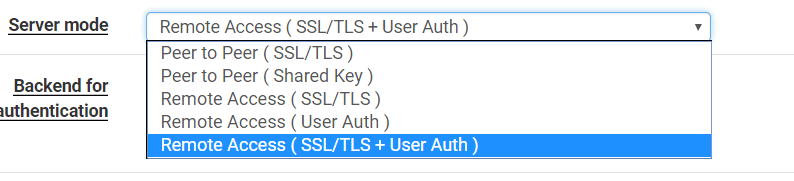
[General Information] Server Mode Remote Access ( SSL/TLS + User Auth) Backend for authentication select the authentication server you created: RADIUS or Active Directory 
[Cryptographic Settings] TLS Configuration checked – a key is automatically generated after the settings are saved; you do not need to enter a key manually. Peer Certificate Authority OpenVPN_CA Server certificate OpenVPN_Cert (Server: Yes, CA: OpenVPN_CA) Strict User/CN Matching If you check this, a user can only connect with his own credentials, not that of other users. I think this is is good idea, so check this option. 
[Tunnel Settings] IPv4 Tunnel Network 192.168.91.0/24 or any other network, as long as it is not in use in your lan/wan and probably not at your users’ locations. I.e. don’t use 192.168.0.0/24, 192.168.1.0/24 and 10.0.0.0/24. Redirect Gateway if you check this, not traffic to your lan will be routed through the tunnel but also to the rest of the internet. If the user starts downloading a BluRay dvd it will go through your company network. On the other hand, they will be behind your corporate firewall. Check this if you use the vpn for secure internet access. Do not check if your corporate line has a slow upload speed. Local Network 192.168.90.0/24 – your corporate LAN’s subnet. Only asked if Redirect Gateway is not checked. [Advanced Settings] DNS Default Domain test.lab (your Active Directory domain name) DNS Server enable check. DNS Servers: provide your AD’s DNS servers. 
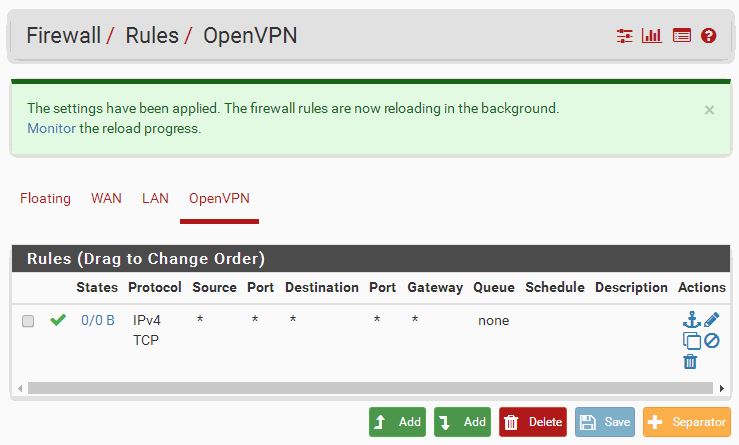
You must create a firewall rule that will allow traffic through the OpenVPN interface. Otherwise what’s the use?
Go to Firewall > Rules > OpenVPN and click Add.
Protocol Any Description Allow OpenVPN traffic. 
You may want to tune this down a bit if this whole contraption turns out to work. I suggest allowing only TCP/UDP traffic and perhaps ICMP if you need to ping as well. You may want to change the Destination to ‘LAN net’ if you don’t want your clients to have internet access. And so on.
Don’t forget to click Apply Changes.

We’ll create a certificate for every user that must be able to use the vpn.
Go to System > Cert. Manager (not User Manager!) > Certificates ad click Add/Sign.
Method Create an internal Certificate Descriptive name [Username of the user that will be using the vpn connection] In some cases this is case sensitive. I tend to stick to all lowercase for that reason. It doesn’t really matter but keep it in mind if the connection can’t be established. Certificate Authority OpenVPN_CA Key length 2048 Digest Algorithm sha256 Lifetime (days) 365 – now here is something to think about. You define here how many days your clients’ certificates are going to be valid. How often do you need those laptop back on your desk? Let’s go with a year for the time being. Common name see Descriptive Name. Certificate Type User Certificate 
Install the OpenVPN Client Export Utility: go to System > Package Manager > Available Packages and install the openvpn-client-export package.

Go to VPN > OpenVPN > Client Export Utility
Remote Access Server AD + Cert UDP4:1194 (or whatever you called your authentication server). Host Name Resolution If you have a static IP (not a semi-static like cable providers give you), enterInterface IP Address here. – If you have a dns address pointing in your direction, enter Installation hostnamehere.Personally, I like to create a dedicated dns entry for vpn connections called vpn.example.com. If you ever decide to move things around it is nice to have things set up modularly. If you’re not sure, stick with Interface IP Address for now. Microsoft Certificate Storage checked Certificate Password choose a random password here and save it for when you need to install it on the client. Under Advanced > Additional configuration options enter: auth-nocache. This will prevent the client from complaining that it may cache passwords.

The ‘Safe a default’ button is a nice touch here. Scroll down and find the user for whom you want to prepare the package. Choose a download option; I’m picking ‘Windows Vista and Later’ because I’ll be testing on Windows 10.


Create a Firewall rule to allow the vpn clients to connect: go to Firewall > Rules > WAN and click Add.

Protocol UDP (if you didn’t change it) Destination This firewall (self) Destination Port Range OpenVPN (1194) Description Allow OpenVPN 
Click Apply Changes.

On the Windows client
Doubleclick the package you exported. My Windows 10 machine threw me warning about being unable to recognize the app.

When I clicked More info a Run anyway button appeared, which seemed appropriate.

Upon installing Windows presented me with the Certificate Import Wizard. It was really helpful.


Ah! Right, the certificate password. Choose your preferences.

Automatically select the store.

Sounds like a success!


Finish the OpenVPN Setup.

Using the Windows client
If it’s not started yet, doubleclick the OpenVPN GUI icon.

Right-click the taskbar icon and choose Connect. Enter the username (without the domain part) and the password.

If all is well OpenVPN should now connect. However it will probably fail and you’ll need to troubleshoot it a bit.

Note: you can ignore the warning about cryptapicert and TLS version 1.1. This is a result of OpenVPN storing the certificate in Windows’ certificate store, which can be done using TLS 1.1 (depricated) or TLS 1.2 (safe, at the time of writing). Because this version of cryptoapicert in OpenVPN does not support TLS 1.2 and newer, TLS 1.1 is used, which is not so safe but safer than storing the certificate in plain text. If the warning really bugs you uncheck ‘Microsoft Certificate Storage’ in the Client Export Utility, export the package and re-install it on the client.
Tweaking the client
Change the name of the .ovpn file
When you connect to your router OpenVPN shows a balloon telling you that the vpn is up. It contains your rather cryptic Windows Installer name, but you can change that to something more appropriate by renaming the .ovpn file in C:\Windows\Program Files\OpenVPN\config (or C:\Windows\Program Files(x86)\OpenVPN\config to whatever name you want the balloon to show.Troubleshooting
- The username may be case sensitive.
- Use pfSense’s fine logging system under Status > System logs > OpenVPN.
- Ask your question in the pfSense forum.
- Windows 7 sometimes adds a Microsoft Virtual WiFi Miniport Adapter. Disabling this sometimes solves vague connection problems where there should be none.
- Is the subnet unique? Perhaps the user is in a subnet that is the same as your virtual or corporate subnet.
- Certificate problems? Check certmgr.msc. Perhaps an old certificate is blocking the installation of a new certificate.
- Client getting disconnected? Check the user’s wifi connection. No wifi=no internet=no vpn.
- Check if your domain controller allows UDP ports 1812 and 1813 throught the firewall. Adding the Network Policy and Access Services role and configuring a RADIUS client should automatically have entered these rules in the server’s firewall. They are called Network Policy Server (RADIUS Accounting – UDP-In) and Network Policy Server (RADIUS Authentication – UDP-In). Note that this is about the firewall on your domain controller, not pfSense’s firewall!
- Change the cryptoapicert SUBJ
Open C:\Program Files\OpenVPN\config\yourconfig.ovpn or C:\Program Files(x86)\OpenVPN\config\yourconfig.ovpn and change the line that says
cryptoapicert "SUBJ:"
to
cryptoapicert "pino"
…replace pino by the user’s username. I may be mistaken but I think this helps specifying which certificate OpenVPN should use in case certificates have a naming conflict.


Setup without Active Directory
Security
Best – Require Unique Certificate and User Auth
- OpenVPN>Servers: be sure to use Remote Access (SSL/TLS + User Auth) rather than User Auth. This is true two factor authentication since it requires a certificate as well as AD credentials.
- Create a separate certificate for each username and lock down OpenVPN>Servers. This requires a unique certificate setup on the pfSense for each AD user. If an employee leaves but knows someone else’s password – they still couldn’t get in:
- Also make sure when you export (OpenVPN>Client Export) that you add a password to the file:
- On the client itself, edit the configuration and add change the line SUBJ: to reflect the common name. For example SUBJ:Superman – this helps OpenVPN know which certificate to grab and can ensure the proper certificate is used.

Better – User non-unique Cert + User Auth
Same as above, except don’t check Strict User-CN Matching
Good (ish)
Just choose Remote Access (User Auth) from the drop down. This is just single factor authentication since it doesn’t require a cert as well
Client Setup
Windows
- Make sure client export package is installed. If not:
- Install the OpenVPN Client Export Utility package as follows:
- Navigate to System > Packages, Available Packages tab
- Locate the OpenVPN Client Export package in the list
- Click
 Install next to that package listing to install
 - Click Confirm to confirm the installation
- Install the OpenVPN Client Export Utility package as follows:
- Using the Export Package:
- Once installed, the package is located at VPN > OpenVPN, on the Client Export tab. That page presents several options which control the behavior of exported clients. The firewall can optionally save selections on this page as new defaults for future use.
- For clients without OpenVPN installed:
- Export the current Windows installer package associated with the user and run on their computer. This will automatically import the config files.
- For clients with the OpenVPN client already installed:
- Export the ‘Most Clients’ inline config file and import into the client’s OpenVPN software.
 Install next to that package listing to install
 Confirm to confirm the installation
Mac
- Download TunnelBlick and install the software
- Navigate to the OpenVPN Client Export section
- Download the inline configuration and drag it into the configurations folder for Tunnelblick.
- Type in Mac user’s administrative password
- Connect to the VPN and rejoice!
Alternatively you can use Viscocity but this is a paid version. Just export the and install the same way as Tunnelblick.
Troubleshooting
Firewall Rules
Having trouble communicating with remote resources over the VPN? Make sure this rule is in the pfsense:
and

If using pfSense 2.3 or lower
- You probably need to need to enable unencrypted authentication in the NPS Policy:
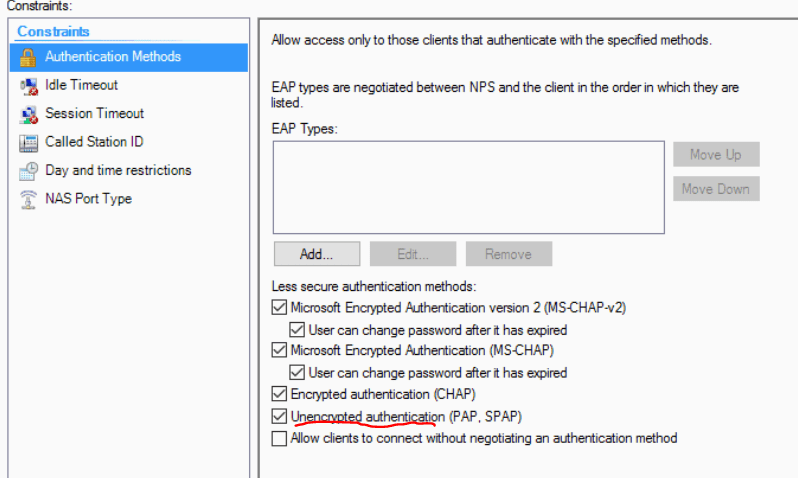
- 2.4+ uses MS-CHAPv2 and doesn’t require Unencrypted Authentication
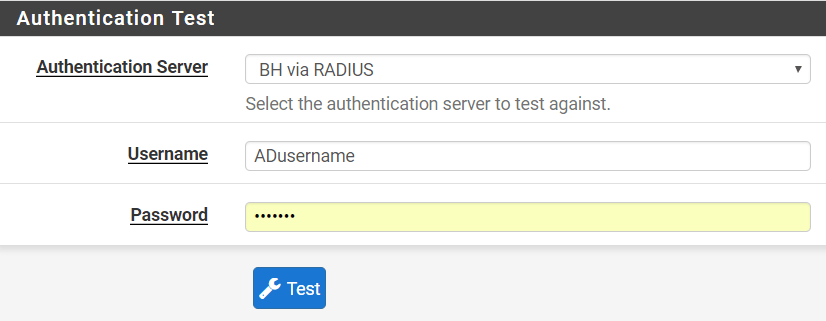
Testing RADIUS connection to server
Go to Diagnostics>Authentication, enter AD credentials to test to make sure the pfSense can query AD correctly
If client is able to connect to the vpn but is not getting an ip address try this https://community.openvpn.net/openvpn/wiki/259-tap-win32-adapter-is-not-coming-up-initialization-sequence-completed-with-errors
Table of Contents