pfSense – Factory Reset or Flash a Broken pfSense
Factory Reset
With Reset button
Power on PFsense and wait 10 seconds and push in reset button and hold until pfsense resets (about 30 Seconds).
Through Console
- Need a mini USB cable
- Plug in mini USB cable to powered on Pfsense and install Windows drivers
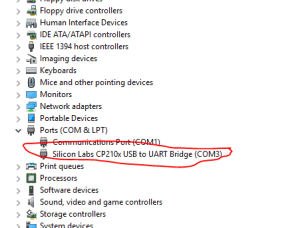
(driver for Netgate: https://www.silabs.com/products/development-tools/software/usb-to-uart-bridge-vcp-drivers) - Identify the COM port of the pfsense when you plug it in via mini USB in the Device Manager (devmgmt.msc). It should look something like this[COM3 in our example]

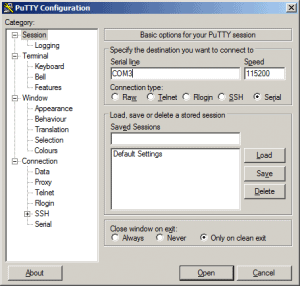
- Configure PuTTY to Serial, set COM port number with Bits per second 115200, Data bits 8, Parity None and Stop bits 1, and click “Open”[COM3 in our example]

- Power on the Pfsense or power cycle it if its already on
- Wait for pfsense to boot, depending on the error that caused the pfsense web interface to be inaccessible you may be prompted here for some information (ex, it may ask for the interface labels (LAN, and WAN)
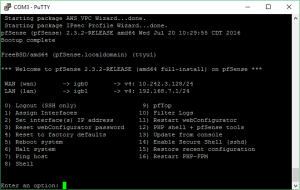
- Once you get to this screen

Choose option 4 for factory reset and wait for it to restart.
How to install pfsense through the USB port and console
- Need mini-USB cable and >700MB USB Flash drive
- Basically it’s the same procedure as connecting via console (mini usb) through putty and telling it to boot from a rufus created pfsense USB installer
Pre-install
- For older pfsenses:
- On the pfsense.org download page, choose File Type “install” and Architecture “Netgate ADI”
- For newer netgate hardware (SG-3100 specifically)
- Download from here
- Use your netgate login information to access the image
- Extract the .img from the .gz with 7zip
- Use Rufus to create “DD Image” with the extracted .img to a USB drive (at least 1 GB)
Connect to pfSense via USB
- Plug in mini USB cable to powered on Pfsense and install Windows drivers
(driver for Netgate: https://www.silabs.com/products/development-tools/software/usb-to-uart-bridge-vcp-drivers) - Identify the COM port of the pfsense when you plug it in via mini USB in the Device Manager (devmgmt.msc). It should look something like this[COM3 in our example]

- Plug in the mini USB cable from the pfsense to the computer but wait to power on the device.
- Configure PuTTY to Serial, set COM port number with Bits per second 115200, Data bits 8, Parity None and Stop bits 1, and click “Open”[COM3 in our example]

- Plug in your rufus-created pfsense boot/install USB flash drive
- Power on the Pfsense or power cycle it if its already on
- For older model pfSenses
- When the first menu appears, you hit F12 to interrupt boot and then pick USB as boot device
- For SG-3100
- Press any key when to stop first autoboot
- Type “run recovery” with USB drive inserted in USB port
- Once complete it will prompt to press any key to reboot the system
- More info is located here
- For SG-2100
- Press any key when to stop first autoboot
- Type “run usbrecovery” with USB drive inserted in USB port
- Once complete it will prompt to press any key to reboot the system
Install
- Install pfSense as you would normally. Mostly you just hit enter a lot. Quick/easy install. Ok, Ok, Standard config (no vga), Ok, etc.
- Make sure to assign the interfaces as LAN and WAN.
- When it’s done, you should have a fresh pfsense a ready to go with LAN as 192.168.1.1


